Tutorial
Click on thumbnailed images to enlarge
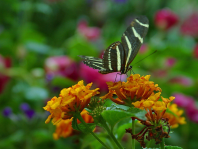
Let's make a bee-uh-uuu-tee-ful icon with MSPaint! I'm going to start off with this lovely resized picture of a butterfly:
Open up MSPaint and resize your canvas to 100x100. Now make a black border (or whatever color you want) around the outside of your canvas, like this:
Put your picture (in this case of the butterfly) into another Paint, then copy and paste your border into the Paint with your picture. Decide what you want the focus point of your icon to be, and put the border around that. You may have to move the border around a bit.
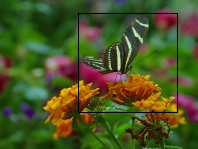
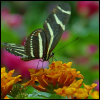
Select just the border and the picture inside, then move that to a new Paint.
You could stop here, but it'd be a pretty boring icon, right? So let's add some more stuff. First off, I'm going to add some text. You can use a font, or just freehand draw it, which is what I did. This is for my sister, so I'll write "Gwyn" in white text.
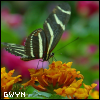
The text itself seems plain to me, so I'll also add a border around the text.
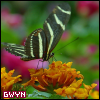
Now I'm going to add a scribble heart in the corner.
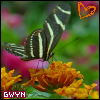
For both the text outline and the heart, I used the color dropper to choose colors from the image I was using. Now I'll use the same technique and add some borders around the whole icon. I also ended up re-writing the text over the borders, and coloring it black.
This is my final product! I hope that this tutorial can help you make your own icons in MSPaint, or any other program. =D
Open up MSPaint and resize your canvas to 100x100. Now make a black border (or whatever color you want) around the outside of your canvas, like this:
Put your picture (in this case of the butterfly) into another Paint, then copy and paste your border into the Paint with your picture. Decide what you want the focus point of your icon to be, and put the border around that. You may have to move the border around a bit.
Select just the border and the picture inside, then move that to a new Paint.
You could stop here, but it'd be a pretty boring icon, right? So let's add some more stuff. First off, I'm going to add some text. You can use a font, or just freehand draw it, which is what I did. This is for my sister, so I'll write "Gwyn" in white text.
The text itself seems plain to me, so I'll also add a border around the text.
Now I'm going to add a scribble heart in the corner.
For both the text outline and the heart, I used the color dropper to choose colors from the image I was using. Now I'll use the same technique and add some borders around the whole icon. I also ended up re-writing the text over the borders, and coloring it black.
This is my final product! I hope that this tutorial can help you make your own icons in MSPaint, or any other program. =D
Tutorial Comments
Showing latest 1 of 1 comments

this is really cool but how do you put a border on the writing? and if you use a text box how do you make it no white for the background?
By brschm10 on Jun 29, 2007 1:25 pm