Tutorial
Click on thumbnailed images to enlarge
First, Open a photoshop document, sized 600px x 400px with a white background
Next, Make sure your background and foreground colours are set to black and white by pressing "D" then go to: Filter > Render > Clouds
Some clouds will appear on your document, then go to: Filter > Pixelate > Mezzotint and set it to "Long Strokes"
Some lines will appear, and finally you go to: Filter > Blur > Motion Blur and set it to:
Angle: 90
Distance: 999
And vertical bars will appear, next, if you want them to be rainbow coloured, create a new layer and select the gradient tool and select the rainbow gradient and set it to "Linear Gradient" and drag it from left to right on your document - if you hold down "shift" it will go in a straight line
Then set your layer to "Overlay" and you will see rainbow coloured bars
After this you can go to: Layer > New Adjustment Layer > Curves and adjust the settings to your liking
You can also create a small selection in the middle of your document and go to Select > Feather and set it to 30px, and go to Image > Adjustments > Curves and change that to make it brighter and to how you like it
This next part is optional, get your Eliptical Marquee tool and create a huge ring over the bars so only a small area at the corners is not inside, then go to: Select > Modify > Feather and set it to 30px
Go to: Select > Inverse and go to Edit > Fill and chose the colour as "Black"
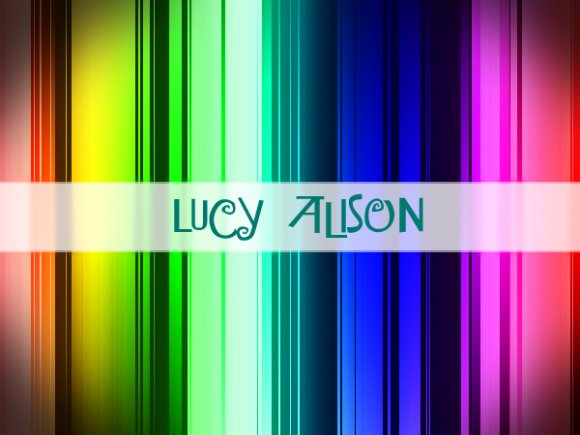
Then, get your Rectangular Marquee Tool and create a rectangle across the middle of your document (see tutorial pic), then keeping the selection on, go onto the first layer with your bars on, then Copy and Paste it onto a new layer, underneath the rainbow gradient layer and go to: Filter > Blur > Gaussian Blur and set the radius to 3.2px
Then keeping the selection go and create a new layer ontop of all the other layers and fill the selection with white and set the layer Opacity to 50%, and duplicate the layer and zoom in go to Edit > Free Transform and drag it in smaller at the top and the bottom by a couple of pixels
Add some text and you're done!You can use this for icons, Backgrounds, Tutorials and More, please credit me for my tutorial!
Next, Make sure your background and foreground colours are set to black and white by pressing "D" then go to: Filter > Render > Clouds
Some clouds will appear on your document, then go to: Filter > Pixelate > Mezzotint and set it to "Long Strokes"
Some lines will appear, and finally you go to: Filter > Blur > Motion Blur and set it to:
Angle: 90
Distance: 999
And vertical bars will appear, next, if you want them to be rainbow coloured, create a new layer and select the gradient tool and select the rainbow gradient and set it to "Linear Gradient" and drag it from left to right on your document - if you hold down "shift" it will go in a straight line
Then set your layer to "Overlay" and you will see rainbow coloured bars
After this you can go to: Layer > New Adjustment Layer > Curves and adjust the settings to your liking
You can also create a small selection in the middle of your document and go to Select > Feather and set it to 30px, and go to Image > Adjustments > Curves and change that to make it brighter and to how you like it
This next part is optional, get your Eliptical Marquee tool and create a huge ring over the bars so only a small area at the corners is not inside, then go to: Select > Modify > Feather and set it to 30px
Go to: Select > Inverse and go to Edit > Fill and chose the colour as "Black"
Then, get your Rectangular Marquee Tool and create a rectangle across the middle of your document (see tutorial pic), then keeping the selection on, go onto the first layer with your bars on, then Copy and Paste it onto a new layer, underneath the rainbow gradient layer and go to: Filter > Blur > Gaussian Blur and set the radius to 3.2px
Then keeping the selection go and create a new layer ontop of all the other layers and fill the selection with white and set the layer Opacity to 50%, and duplicate the layer and zoom in go to Edit > Free Transform and drag it in smaller at the top and the bottom by a couple of pixels
Add some text and you're done!You can use this for icons, Backgrounds, Tutorials and More, please credit me for my tutorial!
Tutorial Comments
Showing latest 3 of 3 comments

adorbzz.:3
By scenegirl988 on Jun 21, 2011 3:09 pm

i love this one..thanks
By deepfriend on Nov 15, 2010 12:09 pm

cute(: thanks
By georgejetKins on Jul 10, 2010 5:32 pm
Tutorial Details
| Author |
lolzies
|
| Submitted on | Jul 8, 2010 |
| Page views | 5,765 |
| Favorites | 17 |
| Comments | 3 |
| Reviewer |
manny-the-dino
|
| Approved on | Jul 10, 2010 |