
Tutorial
Click on thumbnailed images to enlarge
Howdy howdy =) Who's ready for another coloring tutorial??
STEP 001: OPEN YOUR BASE
My base photo for this tutorial is the lovely Katy Perry, ladies and gentlemen!

You may or may not choose to sharpen the image beforehand, but that's all up to you =)
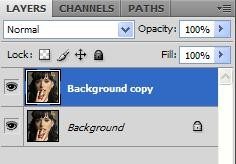
STEP 002: DUPLICATE YOUR BACKGROUND
Press CTRL+J or right click your layer and select "Duplicate Layer"
STEP 003: LAYER > NEW ADJUSTMENT LAYER > BRIGHTNESS/CONTRAST
Use these specifications.
BRIGHTNESS +4
CONTRAST +15

STEP 004: LAYER > NEW ADJUSTMENT LAYER > LEVELS
Use these specifications.
21, 1.15, 255

STEP 005: LAYER > NEW ADJUSTMENT LAYER > COLOR BALANCE
Use these specifications.
MIDTONES +84, +78, +80
SHADOWS 0, 0, 0
HIGHLIGHTS 0, 0, 0

STEP 006: LAYER > NEW ADJUSTMENT LAYER > CURVES
Use these specifications.
RGB
236, 248
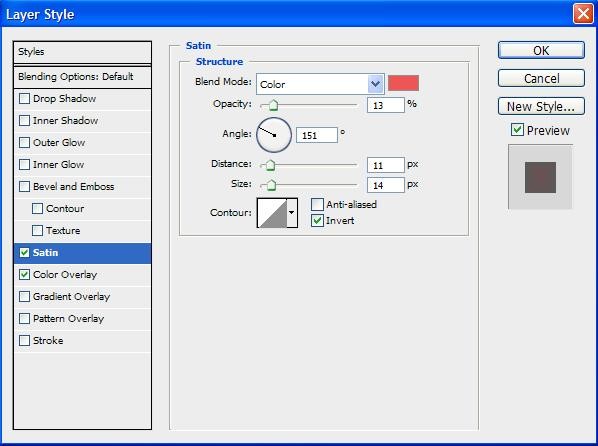
Then, right click this layer and select 'Blending Options.'
Go to the tab labeled 'Satin' and follow these specifications.
(the color used is ee5656)
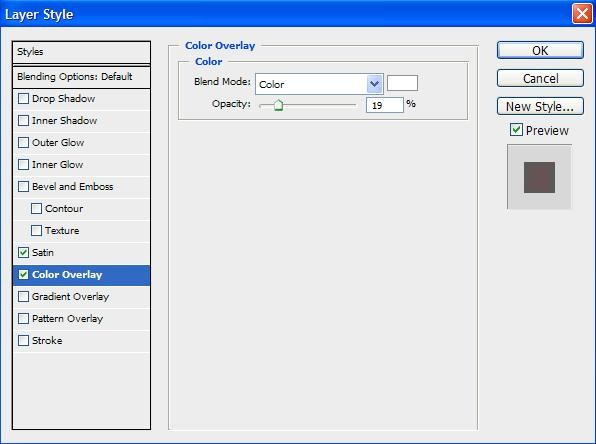
Now go to the tab labeled 'Color Overlay' and follow these specifications.
(the color used is ffffff)
Your image should look something like this so far:

STEP 007: LAYER > NEW ADJUSTMENT LAYER > COLOR BALANCE
Use these specifications.
MIDTONES +52, +70, +25
SHADOWS 0, -39, 0
HIGHLIGHTS 0, 0, +24
And now you have your final product!

I hope you enjoyed
STEP 001: OPEN YOUR BASE
My base photo for this tutorial is the lovely Katy Perry, ladies and gentlemen!
You may or may not choose to sharpen the image beforehand, but that's all up to you =)
STEP 002: DUPLICATE YOUR BACKGROUND
Press CTRL+J or right click your layer and select "Duplicate Layer"
STEP 003: LAYER > NEW ADJUSTMENT LAYER > BRIGHTNESS/CONTRAST
Use these specifications.
BRIGHTNESS +4
CONTRAST +15
STEP 004: LAYER > NEW ADJUSTMENT LAYER > LEVELS
Use these specifications.
21, 1.15, 255
STEP 005: LAYER > NEW ADJUSTMENT LAYER > COLOR BALANCE
Use these specifications.
MIDTONES +84, +78, +80
SHADOWS 0, 0, 0
HIGHLIGHTS 0, 0, 0
STEP 006: LAYER > NEW ADJUSTMENT LAYER > CURVES
Use these specifications.
RGB
236, 248
Then, right click this layer and select 'Blending Options.'
Go to the tab labeled 'Satin' and follow these specifications.
(the color used is ee5656)
Now go to the tab labeled 'Color Overlay' and follow these specifications.
(the color used is ffffff)
Your image should look something like this so far:
STEP 007: LAYER > NEW ADJUSTMENT LAYER > COLOR BALANCE
Use these specifications.
MIDTONES +52, +70, +25
SHADOWS 0, -39, 0
HIGHLIGHTS 0, 0, +24
And now you have your final product!
I hope you enjoyed
Tutorial Comments
Showing latest 4 of 4 comments

Coool
By epepep on Sep 2, 2010 5:08 pm

Awesome.
By futura on Feb 25, 2010 1:16 am

personally, i love the coloring up to step 6, but this is lovely.
By creole on Feb 19, 2010 6:03 pm

the screen shot doesn't look like the final product to me...
but it's pretty neat
By xii3 on Feb 18, 2010 7:53 pm
Tutorial Details
| Author |
paisleyinthesky
|
| Submitted on | Feb 15, 2010 |
| Page views | 11,375 |
| Favorites | 39 |
| Comments | 4 |
| Reviewer |
manny-the-dino
|
| Approved on | Feb 16, 2010 |