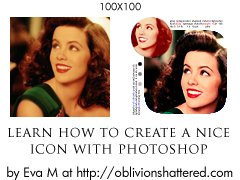
Tutorial
Click on thumbnailed images to enlarge
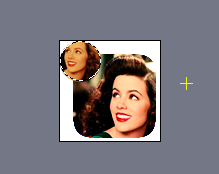
I'll be using a very beautiful Ava Gardner from the film The Aviator (2004), portrayed by Kate Bekinsale. (fantastic movie by the way!)
image credit: UK Hollywood
1. Open up the image you want to edit. Please crop your image if you need to, resize, whatever needs to be done. Please duplicate it twice.
2. You should take your Marquee Tool, & select a portion of your image, like so:
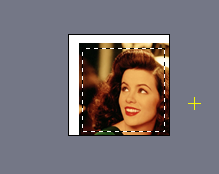
3. Now right click inside that rectangle, > Refine Edge. Insert this: Radius: 0.0, Contrast: 62%, Smooth: 100%, Feather: 0.0, Contact/Expand: 0.0.
4. When you're done refining, right click in the rectangle again, > Select Inverse.
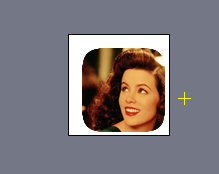
5. Take your eraser & erase the remains. It should look like this:
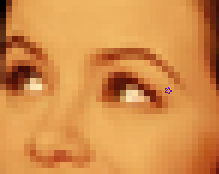
6. Now, like I mentioned before, sharpening it manually is the best way. So zoom in from (600-800%). Don't forget to duplicate this one as well.
7. Sharpen her eyes, nose, forehead, hair roots, lips, round face, etc.
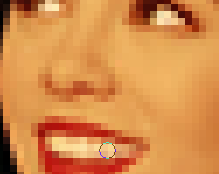
8. Now fetch your Burn Tool, slightly burn her makeup--her eyeshadow, lashes, brows, & alittle on her hairroots, & lips, like so:
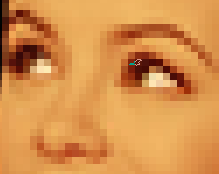
9. Lastly, fetch your Dodge Tool, dodge her teeth & the eyes.
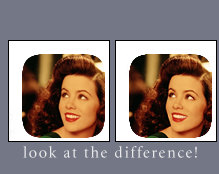
10. Zoom back, you can clearly see the difference!
11. Now you should be able to level, brighten, color balance it, etc.
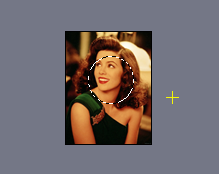
12. Now go back to your original image, resize it into a reasonable small size, & take a lower portion of her face with your Eliptical Marquee Tool:
13. Edit > Copy it, & paste it to your icon, position it on the top left corner.
14. Now you should select it like so:
15. You can level, color balance it, etc. I decided to Lighten it. If you want to do that, select it with your marquee tool, Layer > New Fill Layer > Solid Color. Insert this color: fe0606. Then right click on that layer, >Blending Options > Lighten: 57%.
16. Make a nice text, little circles, be creative. My final result:
If you wish to download my icon brushes &/or icon textures to help you, visit my website Oblivion Shattered in the resource content~
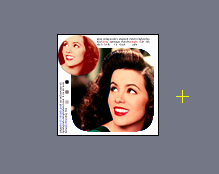
image credit: UK Hollywood
1. Open up the image you want to edit. Please crop your image if you need to, resize, whatever needs to be done. Please duplicate it twice.
2. You should take your Marquee Tool, & select a portion of your image, like so:
3. Now right click inside that rectangle, > Refine Edge. Insert this: Radius: 0.0, Contrast: 62%, Smooth: 100%, Feather: 0.0, Contact/Expand: 0.0.
4. When you're done refining, right click in the rectangle again, > Select Inverse.
5. Take your eraser & erase the remains. It should look like this:
6. Now, like I mentioned before, sharpening it manually is the best way. So zoom in from (600-800%). Don't forget to duplicate this one as well.
7. Sharpen her eyes, nose, forehead, hair roots, lips, round face, etc.
8. Now fetch your Burn Tool, slightly burn her makeup--her eyeshadow, lashes, brows, & alittle on her hairroots, & lips, like so:
9. Lastly, fetch your Dodge Tool, dodge her teeth & the eyes.
10. Zoom back, you can clearly see the difference!
11. Now you should be able to level, brighten, color balance it, etc.
12. Now go back to your original image, resize it into a reasonable small size, & take a lower portion of her face with your Eliptical Marquee Tool:
13. Edit > Copy it, & paste it to your icon, position it on the top left corner.
14. Now you should select it like so:
15. You can level, color balance it, etc. I decided to Lighten it. If you want to do that, select it with your marquee tool, Layer > New Fill Layer > Solid Color. Insert this color: fe0606. Then right click on that layer, >Blending Options > Lighten: 57%.
16. Make a nice text, little circles, be creative. My final result:
If you wish to download my icon brushes &/or icon textures to help you, visit my website Oblivion Shattered in the resource content~
Tutorial Comments
Showing latest 10 of 14 comments

lovvvveeeee ittttt :D !
By BiennChulaaxO on Jan 15, 2010 3:07 pm

how did you do the lettering like that? i cant seem to get it right. and what font did you use and size? D:
By xiiduckies on Dec 2, 2009 11:18 pm

awesomeee :D
By sweet-cottoncandy on Nov 6, 2009 12:37 am
Totally confused
By Jenniferh298 on Oct 23, 2009 2:41 am

i'm stuck at the refine edge part :( i have german photoshop and i can't find it.. i even googled, but i think i don't have it.. it's really upsetting me right now
By MonCherii on Sep 9, 2009 12:41 pm

amazing. :D
By rawrlawlz on Aug 22, 2009 10:48 pm

oh i've been using masks for these styles of icons, but your way is even prettier.
By creole on Aug 22, 2009 12:50 pm

you should really visit my site if you haven't understood this tutorial.
By goth-nina on Aug 12, 2009 6:44 pm

huu huu it wont work for me :(
By kimvalerio on Aug 10, 2009 7:39 am

I love it. It's a nice change from all the crappy tuts we have been getting lately. Wonderful Job.
By none345678 on Aug 6, 2009 11:38 pm
Tutorial Details
| Author |
goth-nina
|
| Submitted on | Aug 5, 2009 |
| Page views | 13,524 |
| Favorites | 80 |
| Comments | 14 |
| Reviewer |
manny-the-dino
|
| Approved on | Aug 5, 2009 |