Tutorial
Click on thumbnailed images to enlarge
Alrighty. So, to start, open your base.
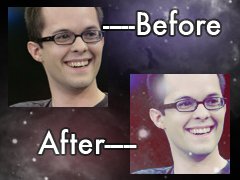
I'm using a picture of Neil Grayston (Fargo from EUReKA)

Before you do anything, create a new document and keep a copy of your base there.
You'll need it soon.
First, go to Image>>Adjustments>>Gradient Map
Choose "Spectrum"
Your image should now look similar to this:
Now, Edit>>Fade Gradient Map
Set it to "Exclusion" at 32%

Here's where you'll need your base copy.
Drag it over to the document you're editing, and make sure you're holding down the "Shift" key.
Set it to "Lighten"

Duplicate that layer and set it to "Overlay" at 20%

Create a new layer and fill it with "e1f4fc"
Set it to "Overlay" at 46%

Now take this texture: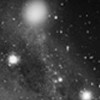
And set it to "Lighten" at 70%
And you're done!
Here's my finished product:
Add whatever you want now to make it your own.
I hope you like your result! :D
I'm using a picture of Neil Grayston (Fargo from EUReKA)
Before you do anything, create a new document and keep a copy of your base there.
You'll need it soon.
First, go to Image>>Adjustments>>Gradient Map
Choose "Spectrum"
Your image should now look similar to this:
Now, Edit>>Fade Gradient Map
Set it to "Exclusion" at 32%
Here's where you'll need your base copy.
Drag it over to the document you're editing, and make sure you're holding down the "Shift" key.
Set it to "Lighten"
Duplicate that layer and set it to "Overlay" at 20%
Create a new layer and fill it with "e1f4fc"
Set it to "Overlay" at 46%
Now take this texture:
And set it to "Lighten" at 70%
And you're done!
Here's my finished product:
Add whatever you want now to make it your own.
I hope you like your result! :D
Tutorial Comments
Showing latest 4 of 4 comments

Thanks! You helped me a lot!
By Andra-A on Sep 28, 2009 5:18 pm

This is great, thanks for posting.
By mcflylover on Aug 25, 2009 6:00 pm

thanks, this effect looks nice.
:)
By anb745 on Aug 3, 2009 8:10 pm

looks pretty cool
nice tutorial ^v^
By JRock-Layouts-and-Graphics on Jul 27, 2009 3:40 pm
Tutorial Details
| Author |
brunette925
|
| Submitted on | Jul 27, 2009 |
| Page views | 6,948 |
| Favorites | 26 |
| Comments | 4 |
| Reviewer |
schizo
|
| Approved on | Jul 27, 2009 |