Tutorial
Click on thumbnailed images to enlarge
Step 1: Chose your image. Here's mine:

Step 2: Go to layers>duplicate. Now go to Adjust>Hue and Saturation>Hue/Saturation/Lightness. Set the saturation to -100 and click ok. This should be your image now:

Step 3: Duplicate your layer again and go to layers>new adjusment layer>invert. Your image should now look like this:
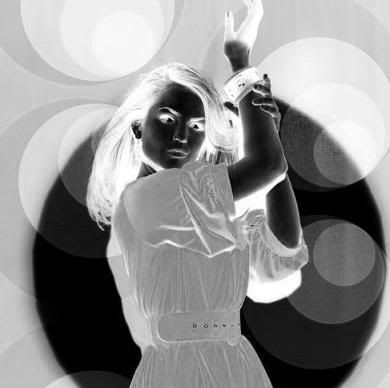
Step 4: Now go to layers>merge>merge down. Now go back to layers>properties and set your blend mode to dodge at 100% Opacity. Your just gonna see some black splotches in a few places like so:

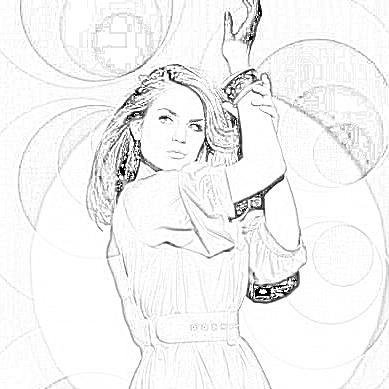
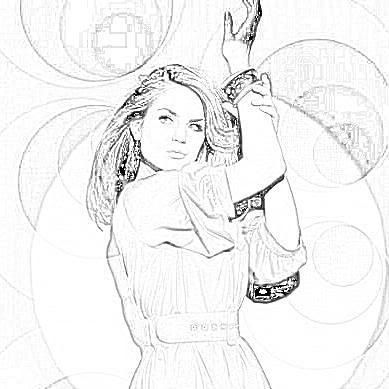
Step 5: The last thing you need to do is go to adjust>blur>blur more. Then go to layers>merge>merge all. Final image:
Step 2: Go to layers>duplicate. Now go to Adjust>Hue and Saturation>Hue/Saturation/Lightness. Set the saturation to -100 and click ok. This should be your image now:
Step 3: Duplicate your layer again and go to layers>new adjusment layer>invert. Your image should now look like this:
Step 4: Now go to layers>merge>merge down. Now go back to layers>properties and set your blend mode to dodge at 100% Opacity. Your just gonna see some black splotches in a few places like so:
Step 5: The last thing you need to do is go to adjust>blur>blur more. Then go to layers>merge>merge all. Final image:
Tutorial Comments
Showing latest 5 of 5 comments

oops i gave the wrong link
http://paintshoppro-tu torials.com/
By angyclick on Apr 18, 2011 4:17 pm
probably one of my favourite effects!!
hey I also found a whole bunch of free PSP PRO X3 video tutorials here
http://paintshoppro-tuto rials.com
they are all full screen video tutorials. enjoy
By angyclick on Apr 18, 2011 4:14 pm
i had try it
its all ok until step 4
after i do step 4, which is the merge down 1,
how come the picture become clearer?
same like the picture before i do the invert..
and the invert layer had gone
can anyone tel me please.
By zaxchy on Mar 5, 2009 10:35 pm

or you can just use the scripts. . .but this works.
By NaShae on Feb 22, 2009 12:01 pm

so cool. (:
By futura on Feb 7, 2009 2:20 am
Tutorial Details
| Author |
lc2008
|
| Submitted on | Feb 6, 2009 |
| Page views | 26,580 |
| Favorites | 23 |
| Comments | 5 |
| Reviewer |
Blaqheartedstar
|
| Approved on | Feb 6, 2009 |