Tutorial
Click on thumbnailed images to enlarge
Iconesque Colouring Pt. 6
Enhancing Autumn Themed Colours through Selective Colouring
THIS TUTORIAL WILL ONLY WORK IN PHOTOSHOP..NOT PSP
Selective Colouring:
Selective Colouring narrows out the major colors, and gives you the ability to edit just one colour. Take yellow for instance. If you have a graphic that has too much yellow then through selective colouring you can manipulate that yellow colour.
How to get to it:
Layer >> New Adjustment Layer >> Selective Colouring
Colours used within Selective Colouring:
on the sliders:
CYAN: Blue (how blue an image is)
MAGENTA: Redness/Pinkness
YELLOW: Yellow, duh!
BLACK: Controls the black parts of a picture, but it also seems to make everything else darker
On the drop down menus:
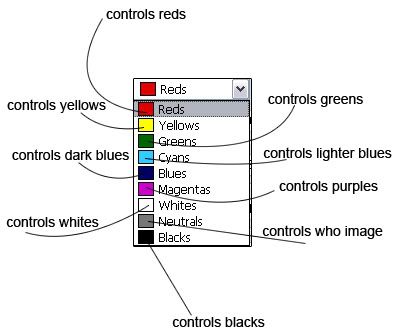
What this tutorial will show you:

The Tutorials:
#1-
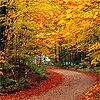
a)Grab your Base:

Now, look at your picture. I can see the reds and the yellows and the greens and the oranges. They're just fairly dull. They need some spice! This is where selective colouring comes in handy.
b) Go Layer>> New Adjustment Layer>> Selective Color
You will be prompted with this popup box:

Just press Okay and the it'll come up with this:
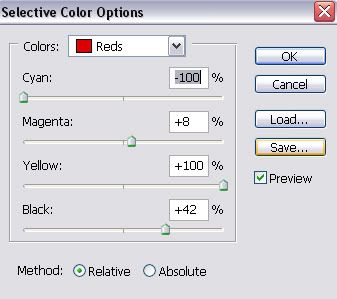
and use these settings.
BUT DONT CLOSE OUT OF THE BOX! KEEP IT OPEN!
But..if you typed in the settings correctly you should have gotten this:
Now, by using the drop down menu (which controls more aspects of an image :O ) click up on GREENS
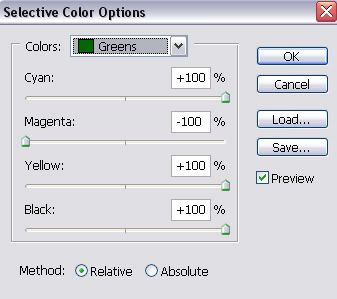
These are the settings. BUT REMEMBER TO NOT CLOSE THE BOX!
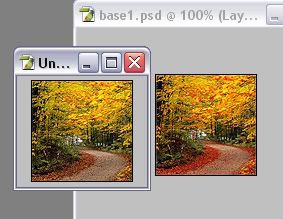
And this is the effect:
Clearly, you can already see the effects these settings have had. The reds on the leaves of the trees are like OMGHI and the greens went from ew boring gray to faboulas green.
But..theres one more setting. I want the yellow on the leaves to stand out. LIKE REALLY.
So, with your box still open (and if you close it, it really is no big deal, just double click on the layer :) ) use the drop down menu to go to yellows!
Yay for yellow.
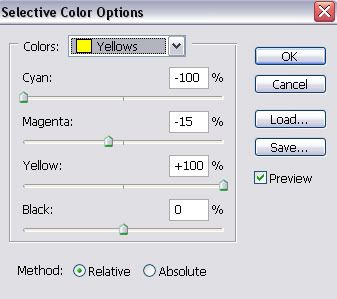
Those are your settings (now you can close the box)
and your result should be
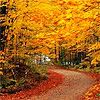
Isn't it lovely? See how the autumn colours stand out so much? I really wish I could be wherever that photo was taken.
[size=7]-----------[/size]
Now that you know all about the colors and everything, i'm just going to post the settings for the other two icons.
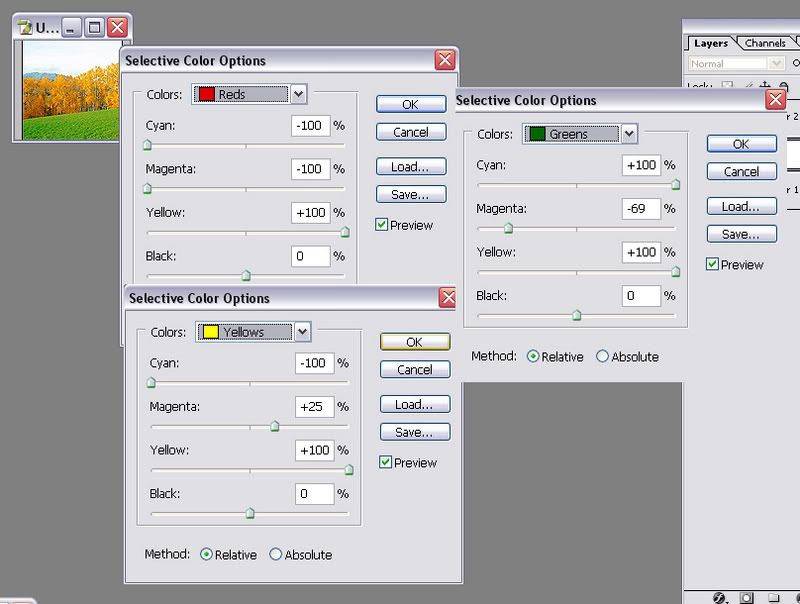
This image is Thumbbed. Click for bigger :D

Same with image above :)
Alright. If ya'll would like something further explained, then please post or PM me and I shall explain. I hope it isn't too confusing.
Enhancing Autumn Themed Colours through Selective Colouring
THIS TUTORIAL WILL ONLY WORK IN PHOTOSHOP..NOT PSP
Selective Colouring:
Selective Colouring narrows out the major colors, and gives you the ability to edit just one colour. Take yellow for instance. If you have a graphic that has too much yellow then through selective colouring you can manipulate that yellow colour.
How to get to it:
Layer >> New Adjustment Layer >> Selective Colouring
Colours used within Selective Colouring:
on the sliders:
CYAN: Blue (how blue an image is)
MAGENTA: Redness/Pinkness
YELLOW: Yellow, duh!
BLACK: Controls the black parts of a picture, but it also seems to make everything else darker
On the drop down menus:
What this tutorial will show you:
The Tutorials:
#1-
a)Grab your Base:
Now, look at your picture. I can see the reds and the yellows and the greens and the oranges. They're just fairly dull. They need some spice! This is where selective colouring comes in handy.
b) Go Layer>> New Adjustment Layer>> Selective Color
You will be prompted with this popup box:
Just press Okay and the it'll come up with this:
and use these settings.
BUT DONT CLOSE OUT OF THE BOX! KEEP IT OPEN!
But..if you typed in the settings correctly you should have gotten this:
Now, by using the drop down menu (which controls more aspects of an image :O ) click up on GREENS
These are the settings. BUT REMEMBER TO NOT CLOSE THE BOX!
And this is the effect:
Clearly, you can already see the effects these settings have had. The reds on the leaves of the trees are like OMGHI and the greens went from ew boring gray to faboulas green.
But..theres one more setting. I want the yellow on the leaves to stand out. LIKE REALLY.
So, with your box still open (and if you close it, it really is no big deal, just double click on the layer :) ) use the drop down menu to go to yellows!
Yay for yellow.
Those are your settings (now you can close the box)
and your result should be
Isn't it lovely? See how the autumn colours stand out so much? I really wish I could be wherever that photo was taken.
[size=7]-----------[/size]
Now that you know all about the colors and everything, i'm just going to post the settings for the other two icons.
This image is Thumbbed. Click for bigger :D
Same with image above :)
Alright. If ya'll would like something further explained, then please post or PM me and I shall explain. I hope it isn't too confusing.
Tutorial Comments
Showing latest 5 of 5 comments

^ Nope. Works with all pictures, just the settings will be different. Different settings occur for every different picture. I only used Autumn pictures as an example on how well you can enhance/dramatically change something.
By technicolour on Jan 16, 2007 6:19 pm

wonderful tutorialbut i was just wondering if works well only with autumn photos?
By synthase on Jan 16, 2007 3:30 pm

^ Not weird at all. Kristina-tuts make me happy. Awesome again, Kristina. :)
By superstitious on Oct 18, 2006 8:51 am

It's weird, but I get really really happy whenever I see that you made another part.
By kayceeisms on Oct 14, 2006 5:42 pm

you. evil. person. with. selective. color.w/e. i found out how to do it without selective color! so there :P
By insomniac on Oct 14, 2006 12:23 am
Tutorial Details
| Author |
technicolour
|
| Submitted on | Oct 13, 2006 |
| Page views | 31,694 |
| Favorites | 44 |
| Comments | 5 |