Tutorial
Click on thumbnailed images to enlarge
I don't think it's translatable.
(Meaning if it is also compatible with Paint Shop Pro, etc.)
1. Grab your base or image.
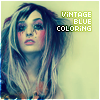
I am using this base of Audrey Kitching:

-
2. OPTIONAL: Duplicate your image and set it to "Overlay", "Soft Light" or whichever you prefer. It's nice to experiment around with the layers. :D
-
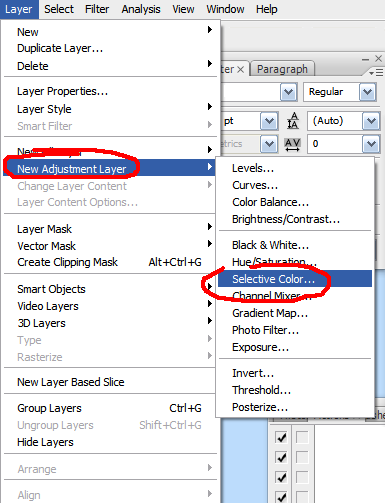
3. Go to Layer> New Adjustment Layer> Selective Color.
-
4. Then input these numbers in the following order:
Reds:+67, -48, -26, +31
Cyans: +29
Whites: 0, -45, +18, +8
Neutrals: +59, -11, -27, +15
Blacks: +51, +25, +23, -12
-
5. Make a new layer. (Ctrl+shift+n)
and fill it with #1200ff or any rich blue color.
-
6. Set it to "Exclusion" and Opacity at 20%.
Annnd you're done!
This is my result along with other examples of the same coloring. n__n :


* Also, if your result comes out looking weird, please note that this tutorial might not work well with some images.
If you are experiencing problems, either contact me or download this action.
To install an action, go to Window> and select "Actions". The window will appear and press this:
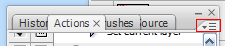
Click "Load Actions" and find the action you downloaded.
Hope that helps. (:
Tutorial Comments
Showing latest 9 of 9 comments

i love it.
so much.

ohh, this works really well.
I messed around with some blending options and got this:
http://i42.tinypic.com/nzk hh2.png

thanks very much, good tutorial!

i agree with miris92. But thanks to addict :) Now i get it.

@miris92;
You go to the top and click "Layer". Then click "New Adjustment Layer" and select "Selective Color". And press OK.
The window "Selective Color Options" pops up.
Type in the numbers for each color. There is a scroll box saying, "Colors". You use that to navigate between each color it tells you to.
For step 5, go to "Edit" at the top. Click "Fill".
Select "Color..." and you can choose a color. Input that color.
And press OK for all.
You click on the new layer with the blue color. There is a drop down box that is to say, "Normal". Click that and find "Exclusion".
Next to that, there is "Opacity". Click that twice and type in 20.

got confused.
need to be a bit more clear.
with step 4 ( i didnt get those options_
step 5 ( didnt know where to put the color)
step 6( where is the exclusion)
and i do have CS3 ext.

this is cute!
i'm really glad you posted this up!
now i know how to photo shop!

regular photoshop doesnt have all the options : (
ooohh! this is awesome. trying now
Tutorial Details
| Author |
addict
|
| Submitted on | Oct 1, 2008 |
| Page views | 28,612 |
| Favorites | 116 |
| Comments | 9 |
| Reviewer |
manny-the-dino
|
| Approved on | Oct 1, 2008 |