Tutorial
Click on thumbnailed images to enlarge
 >>
>> 
The effect works best with screencaps from movies, I think so.
Let's begin.
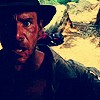
1. Open your base or grab mine and follow along. I used a cap from Indiana Jones and the Temple of Doom.
2. Duplicate the base by hitting ctrl + J and set it to soft light at 100%(NOTE: I had already set mine to screen, merged the layers, THEN duplicated it and set it to soft light so my outcome might be slightly different than yours). Sharpen it.

3. Create a new layer by hitting ctrl+shift+n. Fill it with #020B4E and set that layer to exclusion at 100%.

4. New layer. Fill it with #4D2E2C. Set it to soft light at 60%.

5. Another new layer! Fill it with #CDF3F4 and set it to color burn at 100.
6. New layer. Fill it with #FDB968 on soft light at 100.
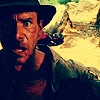
7. Duplicate the base and put it on top of everything. Set it to screen at 75%(NOTE: I set mine at 75% because it looked too bright to me. It's all about preference).

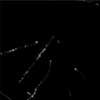
8. I blurred part of Indy's chest 'cause it looked pixel-y to me. Then, I added a scratch texture and set it to screen at 100%. I erased part of the texture covering Indy's face.
 >>
>> 
9. Now you know the drill, add text, brushes, anything you like.
And you're done!
Tutorial Comments
Showing latest 2 of 2 comments

tried it!! looks great.
this is how it came out for me:
http://i458.photobucket.c om/albums/qq310/sugarbliss1/ic ons/icon-1.png
By vishuzmamacita on Oct 18, 2008 6:39 pm

lmao. nice phrase. Great tutorial. Simple with a great outcome.
By raspuhberry on Jul 14, 2008 6:12 pm
Tutorial Details
| Author |
skywalkers
|
| Submitted on | Jul 13, 2008 |
| Page views | 13,173 |
| Favorites | 36 |
| Comments | 2 |
| Reviewer |
manny-the-dino
|
| Approved on | Jul 14, 2008 |