Tutorial
Click on thumbnailed images to enlarge
Banneresque V.2
For: Photoshop
Involves Selective Colouring, Curves, and Hue/Saturation Layers
NOT TRANSLATEABLE
For further help, be sure to check out Banneresque 1, and my Selective Colouring tutorial. :)
On with the fun!
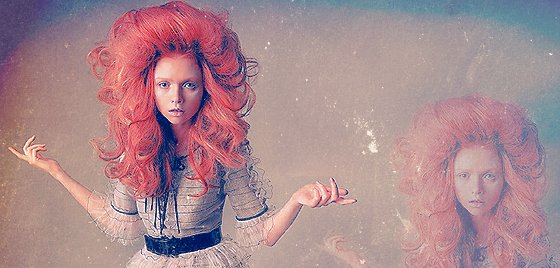
Today we'll be making this:
Looks hot, right?! I totally think so. So, I think we shall start!
Step One: Obtain your picture
This isn't quite the original, but I sharpened it a couple of times. Since I did sharpen it, it got a little bit pixelated around her, so just take a small sized blur brush and just blur around her. BUT DONT BLUR HER! Of course.
Step Two: Return of the Textures
Add this texture:
and set it to screen, which'll give you this
Step Three: Textures:Ressurection
add this texture:
and set that to screen, as well, which'll give you this
Step Four: Random
Okay, so this is going to seem a bit random, but, what I did was randomly brush this brush all over the canvas, and then erase the part where it covered her.
Le Brush:
My random brushings:
After I did my brushings, I put that layer on Screen @ 25% Opacity, which gave me this:
I promise you it makes a difference, later. :D
Step Five: Colour my world!
Now, we shall add some color. Because it looks dull. So, IN PHOTOSHOP, Go LAYER >> New Adjustment Layer>> Selective Color, and use these settings:
REDS:
Cyan: -100
Magenta: +64
Yellow: +100
Black: +100
YELLOWS:
Cyan: -100
Magenta:+100
Yellow: +100
Black: +100
BLUES:
Cyan: +100
Magenta: 0
Yellow: +100
Black: +100
WHITES:
Cyan: 0
Magenta: +28
Yellow: +48
Black: 0
and hit okay. See the difference. It's like, WHOA! She really has red hair. It's amazing.
My Results:
Step Six: Colour
New Layer, Flood Fill with #FFECDA and set that to Soft Light @ 55% Opacity. Yes, it does wash it out.
Le Result:
Step Seven: Never Fear!
It wont be washed out for long ,because we're doing another selective color layer! WOOT!
Use these settings:
REDS:
Cyan: -100
Magenta: 0
Yellow: +17
Black: 0
Yellows:
Bump EVERYTHING up to +100
BLACKS:
Cyan: +100
Magenta: 0
Yellow: -22
Black: 0
ZOMG! It makes more color!
My Result:
Step Eight: Blue like a smurf
Create a new layer, flood fill with #DAF7FF and set to COLOR BURN.
My Result:
Step Nine: Revenge of the Selectives
Once again, another selective colour layer. I think, *think*, though, that this is the last one. We still have curves and hue/saturations ones. WOOT!
Le SettingsL
REDS:
Cyan: -100
Magenta: 0
Yellow: 0
Black: -1
and fin. More color. Can you tell I kinda want her hair to stand out?
Le Result:
Step Ten: We're Close..I Promise
Take this texture and set it to Soft Light, and erase the parts that are on the girl. She doesn't quite look right multi colored.
Le Texture:
Le Result:
Isn't that just a PUNCH! of colour?
Step Eleven: I like quickies
Create new Hue/Saturation layer
(Layer >> New Adjustment Layer>> Hue/Saturation)
Bump the saturation up to 1=+12
See?:
That was quick
Step Twelve:
New Curves Layer (New Adjustment Layer >> Curves )
Change the little drop down menu to blue, and click randomly, and in the bottom there are two boxes input:
Input: 52
Output: 82
That gives it just a slight yellow twinge. See?
Step Thirteen:
New Color Balance Layer (New Adjustment Layer >> Color Balance)
Use these settings:
Results:
Step FOURTEEN: EVERYONE PAY ATTENTION
This can be confusing. Follow me step by step exactly!
- Create a new layer
- make sure new layer is selected on layers pallete
- on your keyboard hit CNTRL + ALT + SHIFT + E ALL AT ONCE
Using an eraser, erase everything except the girl. You don't exactly have to be to precise, but when you get to the areas around her hair, use a soft edge so the hair will blend a bit better.
Once you have everything erased, move the girl to the left, in that blank area. Set that layer to SOFT LIGHT.
Result:
and your done! The rest is up to you. I just added some text and thats it. Promise.
For: Photoshop
Involves Selective Colouring, Curves, and Hue/Saturation Layers
NOT TRANSLATEABLE
For further help, be sure to check out Banneresque 1, and my Selective Colouring tutorial. :)
On with the fun!
Today we'll be making this:
Looks hot, right?! I totally think so. So, I think we shall start!
Step One: Obtain your picture
This isn't quite the original, but I sharpened it a couple of times. Since I did sharpen it, it got a little bit pixelated around her, so just take a small sized blur brush and just blur around her. BUT DONT BLUR HER! Of course.
Step Two: Return of the Textures
Add this texture:
and set it to screen, which'll give you this
Step Three: Textures:Ressurection
add this texture:
and set that to screen, as well, which'll give you this
Step Four: Random
Okay, so this is going to seem a bit random, but, what I did was randomly brush this brush all over the canvas, and then erase the part where it covered her.
Le Brush:
My random brushings:
After I did my brushings, I put that layer on Screen @ 25% Opacity, which gave me this:
I promise you it makes a difference, later. :D
Step Five: Colour my world!
Now, we shall add some color. Because it looks dull. So, IN PHOTOSHOP, Go LAYER >> New Adjustment Layer>> Selective Color, and use these settings:
REDS:
Cyan: -100
Magenta: +64
Yellow: +100
Black: +100
YELLOWS:
Cyan: -100
Magenta:+100
Yellow: +100
Black: +100
BLUES:
Cyan: +100
Magenta: 0
Yellow: +100
Black: +100
WHITES:
Cyan: 0
Magenta: +28
Yellow: +48
Black: 0
and hit okay. See the difference. It's like, WHOA! She really has red hair. It's amazing.
My Results:
Step Six: Colour
New Layer, Flood Fill with #FFECDA and set that to Soft Light @ 55% Opacity. Yes, it does wash it out.
Le Result:
Step Seven: Never Fear!
It wont be washed out for long ,because we're doing another selective color layer! WOOT!
Use these settings:
REDS:
Cyan: -100
Magenta: 0
Yellow: +17
Black: 0
Yellows:
Bump EVERYTHING up to +100
BLACKS:
Cyan: +100
Magenta: 0
Yellow: -22
Black: 0
ZOMG! It makes more color!
My Result:
Step Eight: Blue like a smurf
Create a new layer, flood fill with #DAF7FF and set to COLOR BURN.
My Result:
Step Nine: Revenge of the Selectives
Once again, another selective colour layer. I think, *think*, though, that this is the last one. We still have curves and hue/saturations ones. WOOT!
Le SettingsL
REDS:
Cyan: -100
Magenta: 0
Yellow: 0
Black: -1
and fin. More color. Can you tell I kinda want her hair to stand out?
Le Result:
Step Ten: We're Close..I Promise
Take this texture and set it to Soft Light, and erase the parts that are on the girl. She doesn't quite look right multi colored.
Le Texture:
Le Result:
Isn't that just a PUNCH! of colour?
Step Eleven: I like quickies
Create new Hue/Saturation layer
(Layer >> New Adjustment Layer>> Hue/Saturation)
Bump the saturation up to 1=+12
See?:
That was quick
Step Twelve:
New Curves Layer (New Adjustment Layer >> Curves )
Change the little drop down menu to blue, and click randomly, and in the bottom there are two boxes input:
Input: 52
Output: 82
That gives it just a slight yellow twinge. See?
Step Thirteen:
New Color Balance Layer (New Adjustment Layer >> Color Balance)
Use these settings:
Results:
Step FOURTEEN: EVERYONE PAY ATTENTION
This can be confusing. Follow me step by step exactly!
- Create a new layer
- make sure new layer is selected on layers pallete
- on your keyboard hit CNTRL + ALT + SHIFT + E ALL AT ONCE
Using an eraser, erase everything except the girl. You don't exactly have to be to precise, but when you get to the areas around her hair, use a soft edge so the hair will blend a bit better.
Once you have everything erased, move the girl to the left, in that blank area. Set that layer to SOFT LIGHT.
Result:
and your done! The rest is up to you. I just added some text and thats it. Promise.
Tutorial Comments
Showing latest 10 of 28 comments

hey, It would be awesome if you could maybe fix the links?
because i think they got deleted. anyways, thanks :) great image! :D
By georgejetKins on Jun 12, 2010 2:13 pm

How come I cant see all the images uploaded throughout? Like the textures...
By ladydesire on Mar 21, 2009 9:46 pm

i cant see the photos :(
By MangoPancakes on Mar 12, 2009 11:13 pm

uhm no pics of previews appearing.. cant see what textures you mean :S
By tattjunk on Dec 27, 2008 1:18 pm

nvm got it xD
uhh how do i move the girl to the left ? >___
By juliex3 on Nov 5, 2008 8:41 pm
how do i get the random brush thing? D:
By juliex3 on Nov 5, 2008 8:06 pm

basically the coolest thing ever!!
By digitalivory on Oct 5, 2008 6:05 pm

yeah i am wondering the same where can i get that texture??!
that's what i dont get =(
By Juli13 on Aug 1, 2008 11:29 pm

This was absolutley amazing!
Thank you so much for this
By kaylag on Jul 8, 2008 11:08 pm

Do you mind telling me where you got these wonderful textures?
By jennieputh on Dec 27, 2007 3:40 pm
Tutorial Details
| Author |
technicolour
|
| Submitted on | May 3, 2007 |
| Page views | 35,405 |
| Favorites | 133 |
| Comments | 28 |