Tutorial
Click on thumbnailed images to enlarge
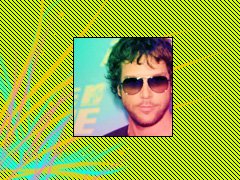
1. Open up your photo and resize it to 100x100
I shall be using a picture of Dane Cook I found on Google.

2. Create a new layer. (shift+ctrl+n)
Put your foreground colour to 00a8ff and fill the new layer (alt+backspace). Set it to Soft Light at 66% opacity.

3.Create another new layer.
Fill it with ffce5a and set it to Linear Burn at 28% opacity.

4. Create ANOTHER new layer.
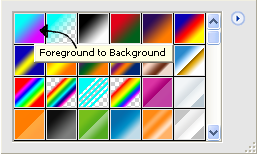
Set your foreground to 01fdf6 and your background colour to e004fe.
Click the Gradient Tool and select Foreground to Background
Click and drag from the OPPOSITEcorner your subject is closest to, to the corner your subject IS closest to. I dragged from the top left to the bottom right.
Set this layer to Soft Light at 100% opacity.

5. Create another layer.
Fill it with ffb400. Set this layer to Overlay at 45% opacity.

6. Create a new layer.
This layer will also be a gradient.
Set your foreground colour to ffb400 and your background colour to e004fe.
Repeat the action of Step 4.
Set this layer to Saturation at 30% opacity.

7. Take a step back, and admire your work. Your done!
Your layers palette should look something like:

Enjoy!
I shall be using a picture of Dane Cook I found on Google.
2. Create a new layer. (shift+ctrl+n)
Put your foreground colour to 00a8ff and fill the new layer (alt+backspace). Set it to Soft Light at 66% opacity.
3.Create another new layer.
Fill it with ffce5a and set it to Linear Burn at 28% opacity.
4. Create ANOTHER new layer.
Set your foreground to 01fdf6 and your background colour to e004fe.
Click the Gradient Tool and select Foreground to Background
Click and drag from the OPPOSITEcorner your subject is closest to, to the corner your subject IS closest to. I dragged from the top left to the bottom right.
Set this layer to Soft Light at 100% opacity.
5. Create another layer.
Fill it with ffb400. Set this layer to Overlay at 45% opacity.
6. Create a new layer.
This layer will also be a gradient.
Set your foreground colour to ffb400 and your background colour to e004fe.
Repeat the action of Step 4.
Set this layer to Saturation at 30% opacity.
7. Take a step back, and admire your work. Your done!
Your layers palette should look something like:
Enjoy!
Tutorial Comments
Showing latest 7 of 7 comments

like it so much!! thanx!!
By falconcyborg on May 8, 2009 7:19 am

cute
By x0MqiiTSzTiTix on Feb 21, 2009 7:55 pm

that's adorable!
oh, and dane cook is a BAMF!
By mcflylover on Jan 17, 2009 2:00 am

lovee it :]]
and def trying it!
:D
By cyaattheswingset on Jan 7, 2009 1:42 pm

pretty awesome!
By -retired- on Dec 30, 2008 11:47 pm

OMG;;
Love it.
By Z0MGsz on Dec 30, 2008 5:54 pm

great overall effect (:
By digitalivory on Dec 30, 2008 3:49 pm
Tutorial Details
| Author |
Skootch
|
| Submitted on | Dec 29, 2008 |
| Page views | 7,791 |
| Favorites | 57 |
| Comments | 7 |
| Reviewer |
manny-the-dino
|
| Approved on | Dec 29, 2008 |