Tutorial
Click on thumbnailed images to enlarge
Banneresque 4
Yay! New installment of Banneresque. Whoot! Is anyone else as excited as I am? Naw. Didn't think so.
Anyways.
Oh, before I begin, i'd like to mention right now that this tutorial will not work on all pictures. Coloring tutorials NEVER work on all pictures. Each picture is unique and has its own color attributes. So. All of the color balance and selective color layers? Totally editable. Just change them to work towards your own image, ok?
Alright. With that nasty disclaimer out of the way, let's get this a-goin'.
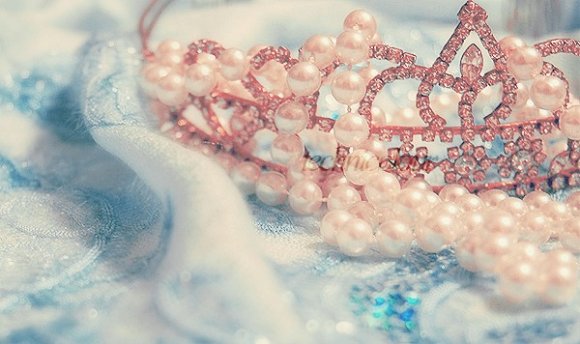
Step One: Find a picture
I will be using a fabulous picture of a tiara submitted by millietee. Find her on here. Her pictures are awesome.
I cropped it down to 600*356.

Step Two:
I created a new curves layer by going Layer >> New Adjustment Layer >> Curves and used these settings:

Step Three:
I created a color balance layer by going Layer >> New Adjustment Layer >> Color Balance and used these settings:

Step Four:
I created a new selective color layer by going Layer >> New Adjustment Layer >> Selective Color and used these settings:


Step Five:
I created a new layer (Layer >> New Layer) and filled it with the color #100F35 and set the layer to Exclusion.
Step Six:
I duplicated my base, way down at the bottom, and dragged it up top and set that duplicated layer up top to Soft Light.
So far, my graphic looks like this:

Step Seven:
I created another new Color Balance layer and used these settings:

Step Eight:
I created a new layer and filled it with the color #FFEA5F and set that layer to Soft Light at 40% Opacity.
Step Nine:
I created a new layer and filled it with the color #F1FBD5 and set that layer to Soft Light at 100% Opacity. But don't panic! Yes, this is going to make your graphic look a bit washed out, but I promise it'll look good!
Step Ten:
I created a new Selective Color layer and used these settings:
 ]
]


Step Eleven:
To try and consolidate all my editing together, I created a new layer and then on my keyboard hit cntrl+alt+shift+e this merging everything below together and putting it on my new layer.
So far, I have this:

Step Twelve:
Now, I know that this effect is a bit cliche, but I'm trying to go with this dreamy, princess-y theme, so I'm going to use the dream effect. So, I'm going to duplicate the top layer and go Filter >> Blur >> Gaussian Blur and i'm going to do the filter at 5 pixels.

Step Thirteen:
So, after I have my blurriness, I'm going to take a large, REALLY LARGE, soft edged eraser, with it set at 40% Opacity I'm going to erase the area of the blurriness over the tiara.

Erase the parts that are red.
Step Fourteen:
Add your own finish touches! It's up to you. The choice is yours.

And yay! Tutorial done! Happy coloring!
Yay! New installment of Banneresque. Whoot! Is anyone else as excited as I am? Naw. Didn't think so.
Anyways.
Oh, before I begin, i'd like to mention right now that this tutorial will not work on all pictures. Coloring tutorials NEVER work on all pictures. Each picture is unique and has its own color attributes. So. All of the color balance and selective color layers? Totally editable. Just change them to work towards your own image, ok?
Alright. With that nasty disclaimer out of the way, let's get this a-goin'.
Step One: Find a picture
I will be using a fabulous picture of a tiara submitted by millietee. Find her on here. Her pictures are awesome.
I cropped it down to 600*356.
Step Two:
I created a new curves layer by going Layer >> New Adjustment Layer >> Curves and used these settings:
Step Three:
I created a color balance layer by going Layer >> New Adjustment Layer >> Color Balance and used these settings:
Step Four:
I created a new selective color layer by going Layer >> New Adjustment Layer >> Selective Color and used these settings:
Step Five:
I created a new layer (Layer >> New Layer) and filled it with the color #100F35 and set the layer to Exclusion.
Step Six:
I duplicated my base, way down at the bottom, and dragged it up top and set that duplicated layer up top to Soft Light.
So far, my graphic looks like this:
Step Seven:
I created another new Color Balance layer and used these settings:
Step Eight:
I created a new layer and filled it with the color #FFEA5F and set that layer to Soft Light at 40% Opacity.
Step Nine:
I created a new layer and filled it with the color #F1FBD5 and set that layer to Soft Light at 100% Opacity. But don't panic! Yes, this is going to make your graphic look a bit washed out, but I promise it'll look good!
Step Ten:
I created a new Selective Color layer and used these settings:
]Step Eleven:
To try and consolidate all my editing together, I created a new layer and then on my keyboard hit cntrl+alt+shift+e this merging everything below together and putting it on my new layer.
So far, I have this:
Step Twelve:
Now, I know that this effect is a bit cliche, but I'm trying to go with this dreamy, princess-y theme, so I'm going to use the dream effect. So, I'm going to duplicate the top layer and go Filter >> Blur >> Gaussian Blur and i'm going to do the filter at 5 pixels.
Step Thirteen:
So, after I have my blurriness, I'm going to take a large, REALLY LARGE, soft edged eraser, with it set at 40% Opacity I'm going to erase the area of the blurriness over the tiara.
Erase the parts that are red.
Step Fourteen:
Add your own finish touches! It's up to you. The choice is yours.
And yay! Tutorial done! Happy coloring!
Tutorial Comments
Showing latest 10 of 25 comments

coool (:
By georgejetKins on Jun 12, 2010 9:38 am

I really like this :D And it didn't take me long AT ALL! Thanks!
By askingalexandria on Apr 24, 2010 2:25 pm

I'm stuck on thirteen.
By MiissYER on Jan 29, 2010 11:42 pm

Oh, how lovely. I think I'm going to try it out sometime :3
By IzzyGrace on Jan 3, 2009 2:03 am

whoa thats a lotttt of work.. and my turned out pretty blurry.. but hey nice work on yours!
By tattjunk on Dec 29, 2008 5:28 pm

how do i do..the exclusion part and hte color..step 5..
By lilvy01 on Dec 26, 2008 7:57 pm

Omg soo long!Took me 46 minutes!But mines TOO blurry and cant get rid of it?
By 4gotten4ever on Dec 22, 2008 6:04 pm

this tutorial is dope man!
tight!
By doodleisLOVE on Dec 15, 2008 3:25 pm

pretttttty(:
By freshlikewha on Dec 14, 2008 12:36 pm

very pretty, i think this will be good for an icon
By creole on Nov 30, 2008 8:17 pm
Tutorial Details
| Author |
technicolour
|
| Submitted on | Nov 3, 2008 |
| Page views | 21,814 |
| Favorites | 155 |
| Comments | 25 |
| Reviewer |
kreios
|
| Approved on | Nov 3, 2008 |